Hi everyone,
Well it's been a busy week so far...
How's your week been?...
Very wet again here, I'm fed up with wet dog walks in wellies and mac!
I don't do winter!
I chose the title of this post from a comment made by a crafty friend, she referred to this as the Tarmac Technique which made me laugh and I thought what a fab title for this technique!
Anyhow I'm pretty overwhelmed by the response to my recent workshop which was held on Sunday.
Thank you all so much for the wonderful comments and feedback I've received, each and everyone is very warmly appreciated and means so much.
The workshop took place a new venue, a Scout Hall local to me with loads of space and good facilities.
It was yet another grim and rainy day and I thank those friends who traveled some distance to take part.
Once inside and on with the projects no one noticed the weather and we had a grand time, at times you could hear a pin drop they were all so focused!
This was my first mixed media workshop in fact it was my first efforts at mixed media of this sort.
So where did the inspiration for these projects come from?
I'd seen a lot of Andy Skinner style mirror frames and I discovered a mixed media artist called Gary Reef, this guy us so cool!
Another technique style we covered which was completely inspired by the most lovely Emma Williams I will cover seperately in another blog post.
I read up about using Bitumen which is used in road construction and waterproofing products for building works.
Which does sound a pretty weird thing to use in art and craft but in 1826/27 it was used in early photographic technology and was frequently used in 19th century painting to emphasise the brilliance of colour.
However over periods of time the bitumen was found to crack and darken.
In Gary's technique however he dilutes the bitumen 50/50 with white spirit to use in his altered art piece.
Although, he uses a canvas and I have changed the method he used as I found this didn't work for me on the frames.
Ok so on to the technique -
The frames are from Ikea, and as cheap as chips!
I bought white frames as I had no idea about my design when I purchased them
so I thought white was a safe option and I could easily darken them, they come in several colour finishes.
Firstly I used a heat tool to carefully remove the mirror from the frame.
When we were doing the workshop my lovely friend Eileen had the idea of using a pre cut die frame over the mirror/frame edge that way you don't need to remove the mirror or worry about painting the edges that might show.
This will show clearer in the image later.
I'm a tad fussy and I tried using masking tape initially but the finish wasn't neat enough for me.
Next I sanded the mirror front and sides and mirror opening recess to give it a key before working on it.
Using white card I built up a collage effect creating different sections and glued these onto the frame.
I used a selection of embossing folders on the card.
Any pieces that require stamping were painted in acrylic paint first the images stamped in Archival ink then these were then stuck on to the frame.
I had a stock of mount board die cuts from Candy Box Crafts which worked perfectly on my Paris theme frame.
Another idea from Gary Reef was to use tin foil which I did by first scrunching before sticking to the card as part of the collage.
All sorts of interest can be added, rivets made by punching holes in card, card candi etc etc.
So having built up the basic collage covering the front of the frame it's then painted very randomly with acrylic paints.
I preferred to use not too dark colours and chose colours like mid blue, yellow, red, pale green, beige and any areas you want to really highlight are painted in gold or other metallic colour.
Everything was stuck down prior to painting except the die cuts which were painted first then glued into position.
Well let me tell you the ladies were thinking "Oh my word this looks like s***!!!"
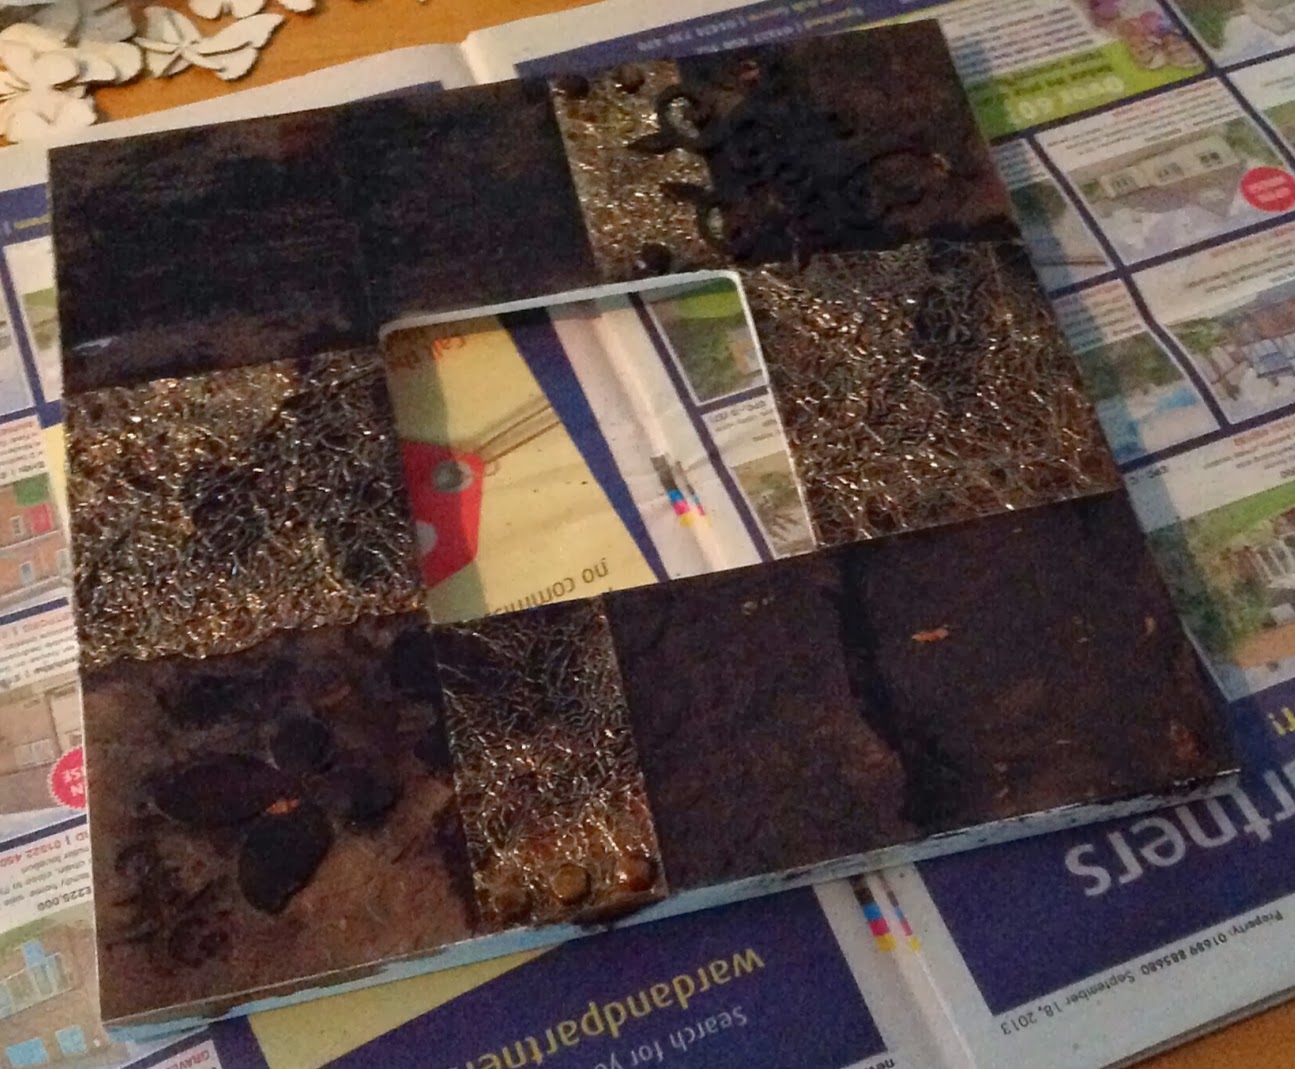
Before the transformation!
The work was then dried using a heat gun if necessary.
Then the fun/messy part begins by painting the whole frame front with the bitumen solution.
This then needs to dry, a heat gun speeds the process.
The next stage is best not rushed, taking a piece of soft cloth with a tiny amount if white spirit you start dabbing away very gently over the frame.
It's like magic and such a wow factor as the whole thing gets lifted and completely transformed.
You really have to do it to appreciate the technique.
If you take time and care the outline, shadow and shading you leave behind really makes the whole piece come alive and the colour looks sublime with the gold/metallic area really coming through!
The sides of the frame can then be painted and the mirror replaced using a glue gun or silicon glue.
I was totally unsure about trying this technique and really didn't think it was for me but I'm totally sold on it, it's amazing you have to try it!!!
The ladies were so sold on it they're coming back for seconds in February where they'll be doing this on a different project piece.
I'm taking further bookings for these classes now, for further info email craftyk@hotmail.co.uk
I'm so thrilled and chuffed they loved it as much as me and I hope you do too...xKx
Now for the photo's starting off with my sample pieces -


Hard at work -

Genius at work, the lovely Eileen who somehow managed to sneak the sweeties and pot in her bag to take home!

Very happy and proud, rightly so of their masterpieces!

Individual works of art -


Eileen's frame - note the die cut frame that "frames" the mirror edge -

Step by step pictures -
Deciding on the layout for frame 1, the whole frame will be covered.-

Tin foil added to frame 2 -

Rivets and card candi -

Deciding on mountboard embellishments -

Painting in progress, stamped images glued in place -
I've used stamps from Chocolate Baroque Steam Punk collections
I've used stamps from Chocolate Baroque Steam Punk collections

The messy bit -
Transformation begins -

Leaving you with images of the next instalment for the alternative frame technique -


No comments:
Post a Comment